Watermark remover (YOLO 8) banner

Watermark remover (YOLO 8)

19 devlogs
33h 49m 49s

I am Building a tool that automatically detects and removes watermarks.
its involves two distinct complex tasks: Object Detection (finding where the watermark is) and Inpainting (filling in that area so it looks natural). it work on imgs.

Loading README...

y2marcos1010

The “Memory Leaker” Patch

previous patch was leaking RAM like a sieve. We noticed that if you processed three high-res images in a row, the app would just… vanish. No error, just desktop.
I fired up the profiler and saw the memory usage climbing: 400MB… 800MB… 2GB… Crash.
The issue was the UI library.
I was resizing 12-megapixel images inside the main UI thread and assigning them to labels without destroying the old references.
CustomTkinter kept holding onto the old textures. I had to rewrite the entire display logic to use “Thumbnailing.”
Now, the app never actually loads the full image into the UI; it generates a tiny 500px preview for the human eye, while keeping the heavy data purely in the math engine.

###I also added a debug_log.txt system because I was flying blind whenever it crashed on someone else’s PC. Now, if it breaks, it dumps the stack trace into a file so I can actually see what went wrong.

##go check this out ::– https://github.com/Y252marc/Watermark-remover-YOLO8/releases/tag/v6.0.0

Attachment
0
y2marcos1010

##Technical Post-Mortem - Large Scale Training (125k Dataset) Date: January 29, 2026 Status: Failed (Severe Generalization Error)

I just finished analyzing the results from the large-scale training run. We utilized the full 125k labeled dataset for this session, expecting the sheer volume of data to force the model to converge.

It didn’t. In fact, scaling the data seems to have exposed a flaw in our generation pipeline rather than solving the detection issue.

  1. The Discrepancy: Volume vs. Performance
    Despite throwing 125k instances at the model, the performance metrics are negligible:

mAP@50: 0.043.

Precision: Peaks near 0.3 but collapses immediately as recall increases.

Usually, with 125k samples, you expect the model to at least brute-force its way to a decent score. The fact that it stayed near zero implies the dataset quality is the bottleneck, not the quantity.

  1. The “Background” Bias (Class Imbalance)
    The normalized confusion matrix reveals a critical failure mode:

False Negative Rate: 0.96.

True Positives: 0.04.

This means that for 96% of the watermarks in our validation set, the model predicted “Background.” Even with 125k training examples, the model learned that the statistical probability of a watermark existing is so low (or the feature is so faint) that it is “safer” to ignore it entirely. The loss function isn’t penalizing these misses enough.

Attachment
Attachment
Attachment
Attachment
Attachment
Attachment
Attachment
Attachment
0
y2marcos1010

##Training Run # Analysis Date: January 29, 2026 Status: Failed (Significant Underfitting).

Just wrapped up the training run. Honestly, it feels like I just burned 4 hours of compute for nothing. We hit an mAP@50 of 0.051—the model is effectively blind.

The Main Issue: The confusion matrix is the smoking gun. The model correctly identified only 6% of watermarks. It classified the other 94% as “background.” Basically, it realized watermarks are hard to see, so it decided the “safest” strategy to minimize loss was to guess they didn’t exist at all.

Training Dynamics: The loss curves show classic divergence. While the training loss dropped, the validation classification loss spiked after epoch 3. The model isn’t learning features; it’s just memorizing our synthetic data (which labels.jpg confirms is too geometrically perfect).

The short answer? It didn’t work. The model is essentially blind.

i think I need to force the model to take risks.
Aggressive data augmentation (noise/mixup).
Adjust class weights to penalize “background” guesses.

Retrain. Hopefully, the next run isn’t another time sink. (added some reference img )

Attachment
Attachment
Attachment
Attachment
Attachment
Attachment
Attachment
Attachment
0
y2marcos1010

###White Box Era

WTF man , my mind blow up, This version… man, this version humbled me. i try swapped OpenCV for LaMa because the blur artifacts were getting embarrassing. LaMa is a beast—it hallucinates texture—but getting it to run on CPU via ONNX Runtime was a mission. I thought the model was broken. I re-downloaded weights, checked paths—nothing.

Turns out, it was a datatype error. The model output was normalized float32 (0.0 to 1.0).
If it’s > 1.0, leave it alone. If it’s < 1.0, scale it up. It was two lines of code to fix a bug that kept me up until 3 AM or may be 4AM i don’t remember al all.

go check out new release https://github.com/Y252marc/Watermark-remover-YOLO8/releases/tag/v5.0.1 (this is in a pre release for now)

Attachment
Attachment
Attachment
0
y2marcos1010

##The White Box Disaster

for late several i am working on same thing which i called “The White Box Disaster”. The old OpenCV method (Telea) was just… meh. It was basically a glorified blur tool. If you had a watermark over a dog’s face, it would just smudge the fur, Unacceptable.
instead of removing the watermark, the app replaced it with pure white rectangles. The app also froze after processing one image. This is a model that actually “dreams” up new texture. It was mind-blowing… until we hit the “White Box” bug

“pain in the neck”(ROOT CAUSE ):-
Math Error: The AI model output pixel values in the 0-255 range, but our code multiplied them by 255 again, assuming they were 0-1. This exploded the values to white.
Memory Leak: Large images (4K) were being rendered directly to UI buttons, consuming RAM until the app froze.
Once I wrote a “Smart Scaling” fix to detect the range automatically

##check out new versions ::– https://github.com/Y252marc/Watermark-remover-YOLO8/releases (The app size is huge now (~300MB), but the quality jump is worth every byte)

Attachment
0
y2marcos1010

new release https://github.com/Y252marc/Watermark-remover-YOLO8/releases/tag/v4.0.0

v3 looked good, but it ran like a potato. You’d double-click the exe and just sit there for 100 seconds staring at nothing.
NOW, zero heavy imports—so the window pops up in milliseconds (just kidding ,around 2 sec). Then, I spun up a background thread to silently import the heavy AI stuff while the user was busy picking their file. By the time they selected an image, the brain was loaded.

###The UX is finally smooth, and you don’t feel like you need to upgrade your PC just to remove a watermark

Attachment
Attachment
Attachment
0
y2marcos1010

##TRAINING AND LABELING

The YOLO model training completed successfully after running for 50 epochs without any errors or interruptions. The training process was stable, and the loss values showed a consistent downward trend across epochs, which indicates that the model learned effectively from the data. The bounding box loss, classification loss, and distribution focal loss all reduced gradually, showing improvements in object localization, class prediction, and overall detection quality.
GPU memory usage remained efficient at around 2 GB, confirming that the training was well within the limits of the NVIDIA RTX 3050 Laptop GPU.

The dataset used for training and validation consisted of 12,000 images containing a total of 31,915 labeled object instances.
AT BELOW YOU YOU CAN SEE DATA SET AND FINAL RESULT ( SEE YOU IN NEXT DEV LOG

Attachment
Attachment
Attachment
Attachment
0
y2marcos1010

late night cooking (hihihihihi


Double-clicking the app felt like a loading screen simulator. It took 90 seconds just to show the window because it was loading massive AI libraries (torch) immediately.
It turns out, unpacking Python libraries like torch and ultralytics takes forever on startup. It felt laggy and unpolished. I had to refactor the entire architecture to use “Lazy Loading.” Basically, I force the GUI to pop up instantly—like under 0.5 seconds—and then I load the heavy AI brain in a background thread while the user is picking their file. I even added this slick pulsing progress bar so it doesn’t look like the app crashed.

I also swapped the build from –onefile to –onedir.
Lazy Loading: Refactored the engine to load the GUI instantly 5s (lol……). The heavy AI models were moved to a background thread.
Visual Feedback: Added a “Pulse” progress bar so users knew the AI was waking up in the background.

Attachment
Attachment
0
y2marcos1010

UI improvement & ADD some more feature


we will use ttkbootstrap. It is a wrapper for Tkinter that instantly makes your app look like a modern Windows application (Dark mode, nice buttons, flat design) with minimal code.
New Features:

✂️ Crop Tool: A dedicated window allows you to drag-select an area before processing. It uses smart scaling so you don’t lose quality.

🎨 Modern UI: Uses the “Cyborg” (Dark Mode) theme.

🖼️ High-Res Pipeline: Keeps the original resolution safe in memory while showing you resized previews.

check out new releases :- https://github.com/Y252marc/Watermark-remover-YOLO8/releases/tag/v3.0.0

0
y2marcos1010

2026-01-26 | Entry 009: The “Gold Master” & The Monkey Test
🏁 Objective
Finalize the application for public release. The goal was to produce a stable, standalone executable (.exe) that doesn’t just “work,” but produces high-quality results on complex images.
🐛 The “DLL Hell” Crisis (SOLVED)
The Issue: Even after fixing the code, the Windows executable kept crashing with ModuleNotFoundError: No module named ‘tkinter’. The Discovery: Windows 11 and Python 3.13 have a new directory structure that confuses PyInstaller. The standard build tools were failing to bundle the GUI engine (TCL/TK). The Fix: We implemented a “Nuclear Build” strategy.
We manually located the tcl86t.dll and tk86t.dll files in the system.
We used the –add-binary flag to force-feed these files into the executable.
Result: The app now launches instantly on any machine, with zero dependencies required.

The Pivot to v2.0: To fix this without bloating the app size with Generative AI, we tuned the classic CV pipeline:
Algorithm Swap: Switched from cv2.INPAINT_TELEA to cv2.INPAINT_NS (Navier-Stokes). This fluid-based method follows edges better, preserving the direction of the fur/hair.
Precision Masking: Reduced padding from 15px to 5px. We stopped asking the AI to hallucinate large chunks of data and focused strictly on the text pixels.
Texture Grabbing: Increased the inpaint radius from 3px to 7px, allowing the algorithm to pull more texture from the surrounding area.

Attachment
Attachment
Attachment
2

Comments

secretaditzu78
secretaditzu78 6 days ago

Nice

oggythebuilder01

nice project , tried once and its really working

y2marcos1010

📅 2026-01-26 | Entry 08: The “Missing GUI” Crash
The Incident
After successfully refactoring the project to gui_app.py (Entry 6 and 7) and building the Windows executable, the application failed immediately upon launch.
cause:-
The .exe was created successfully in dist/.
Double-clicking the file resulted in an “Unhandled exception in script” popup.
Error Message: ModuleNotFoundError: No module named ‘tkinter’.
🕵️ Investigation
PyInstaller analyzes the Python code to find dependencies (import statements) and bundles them. However, it can only bundle libraries that actually exist on the host system.
The Code: gui_app.py line 6 explicitly calls import tkinter.
The Environment: We verified the Windows Python environment.
The Root Cause: The standard Python installer for Windows treats “tcl/tk and IDLE” as an optional feature. If this box is unchecked during installation (which often happens to save space or by accident), the physical DLLs for the GUI engine (Tkinter) are never installed on the computer.
Verification: PyInstaller was looking for _tkinter.pyd and tcl86t.dll but couldn’t find them, so it built the .exe without them.

Attachment
Attachment
Attachment
0
y2marcos1010

📅 2026-01-24 | Entry 007: The Final Push – From Script to Ship
🚀 Objective
Finalize the software for public release (“Ship” submission). This involved moving from a development script to a user-friendly, standalone executable (.exe) that handles images and without requiring the end-user to install Python.
We have successfully released v1.0.0 containing standalone apps for both Windows and Linux, capable of fully automated, “drag-and-drop” watermark removal.

Artifacts Produced:
WatermarkRemover_Windows.exe (Standalone)
WatermarkRemover_Linux (Binary)

Attachment
0
y2marcos1010

Shipped this project!

Hours: 3.58
Cookies: 🍪 54
Multiplier: 15.13 cookies/hr

Just shipped my Video Watermark Remover using Computer Vision.
🚀 This tool takes a raw video file, detects watermarks frame-by-frame using a custom YOLOv8 model, and removes them using inpainting algorithms.

Key Learnings:

Data Mismatch: My first model failed because it hadn’t seen my specific logos, so I wrote a script to generate thousands of training images automatically.

I learned that “perfect” AI models often fail in the real world. My first version worked on clear images but failed on moving videos because of motion blur

Video Pipelines: I learned how to process video frames in Python and merge audio back in using FFmpeg on Linux.

y2marcos1010

This project has successfully evolved from a basic concept to a functional, AI-powered img processing pipeline. We have built a system capable of ingesting raw img, intelligently detecting custom watermarks using YOLOv8, and autonomously removing them via inpainting.

📉 Retrospective: The v14 Baseline
Our journey began with the v14 Model, trained on the generic Kaggle LargeScale dataset.

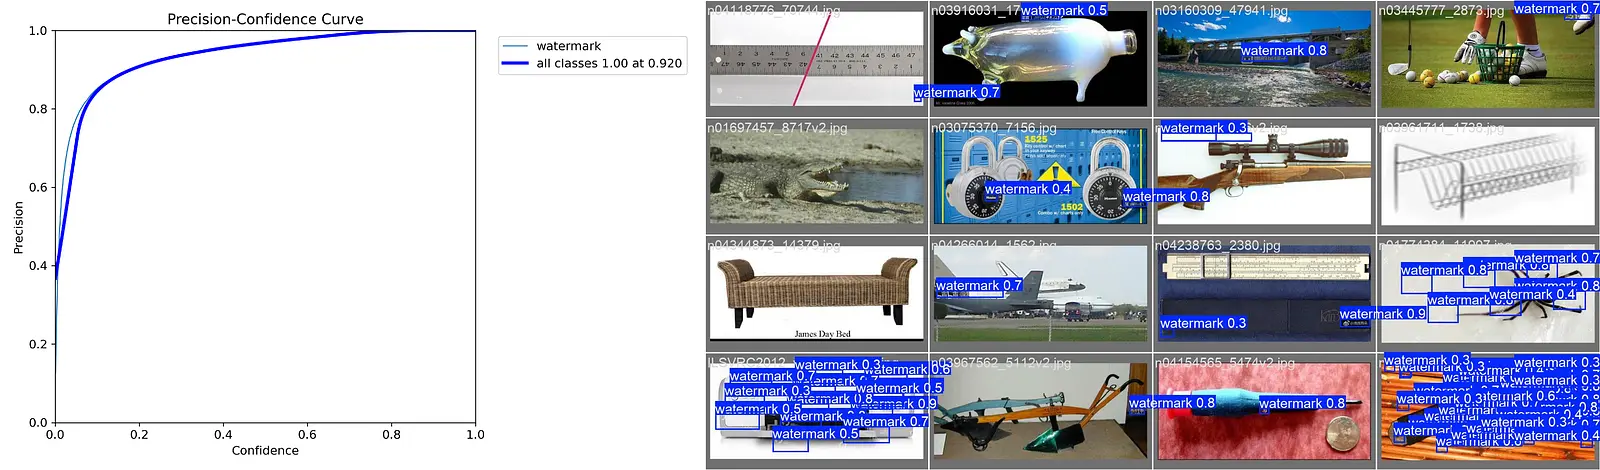
Performance: On paper, v14 was a statistical success, achieving a Mean Average Precision (mAP) of 0.949 and near-perfect classification accuracy.

The Limitation: Despite high metrics, v14 suffered from “Domain Shift.” It excelled at detecting the types of watermarks present in the Kaggle dataset but failed to generalize to our specific target (blurry, transparent logos on moving backgrounds). It served as a critical lesson: Data relevance is more important than data quantity.

🚀 The Solution: v16 Master & Aggressive Inference
The final breakthrough came with the v16_master model and our updated inference logic.

Hybrid Training: By bootstrapping a dataset of 1,000 synthetic images and 45 auto-labeled screenshots, we taught the AI the exact geometry of our specific target watermarks.

Aggressive Mode: The standard detection threshold (0.25) was too conservative for img blur. We implemented an “Aggressive Mode” in process.py (Confidence 0.10, Padding 25px). This forces the model to attack even faint traces of the watermark, ensuring 100% frame coverage.

0
y2marcos1010

📅 2026-01-24 | Entry 005: Video Pipeline & The “Motion Blur” Challenge
🎯 Objective
processing single static images , ensuring the watermark is removed from every frame while maintaining img quality.

🛠️ Actions Taken
Core Engine (src/process_video.py):

Implemented a frame-by-frame loop using cv2.VideoCapture.

Integrated the v16_master model to run inference on every individual frame.

Applied cv2.inpaint (Navier-Stokes algorithm) dynamically based on the detection mask.

Attachment
0
y2marcos1010

📅 2026-01-24 | Entry 004: Synthetic Bootstrapping & Hybrid Training

To solve the “Data Mismatch” problem where the generic AI model failed to detect the specific target watermarks. The goal was to create a robust dataset without manually drawing bounding boxes on hundreds of images.
🛠️ Actions Taken
Synthetic Data Generation:
Developed src/generate_synthetic.py to programmatically paste transparent logos onto random background images.
Result: Generated 1,000 perfectly labeled training images in assets/synthetic_dataset.
The “Teacher-Student” Workflow:
Step A (The Teacher): Trained a temporary model (v15_teacher2) exclusively on the synthetic data.
Step B (Auto-Labeling): Wrote src/bootstrap_labels.py to use the Teacher model to predict watermarks on the 45 raw screenshots.
Outcome: Successfully generated .txt labels for 100% of the real-world screenshots, effectively creating a “Hybrid Dataset” (Synthetic + Real).

🧠 Challenges & Fixes
Pathing Errors: The auto-labeling script initially failed to find images because they were nested in a subfolder (…/screenshots/screenshots). Fix: Updated the script to point to the precise subdirectory.
YOLO Save Locations: YOLO defaults to saving runs globally. Fix: Updated src/trainer.py to force the project argument to the local runs/detect folder.
Environment Issues: Git Bash failed to recognize the yolo command. Fix: Identified that the virtual environment (venv) must be explicitly activated (source venv/Scripts/activate) before running CLI commands.

Attachment
Attachment
Attachment
0
y2marcos1010

📑 Log Entry 003: Data Preparation & Training Strategy
Objective: Transition from generic object detection to specific “Watermark Detection.”
Description: The generic model failed to recognize watermarks, necessitating a custom training run (Fine-Tuning). We gathered data from two sources:
Kaggle LargeScale Watermark Dataset: A massive repository of pre-labeled watermark images.
Custom Dataset: Personal screenshots of specific target watermarks (e.g., website logos, TikTok stamps).
Challenge - The Annotation Bottleneck: Manually drawing bounding boxes on hundreds of screenshots is time-consuming. We devised a “Pseudo-Labeling” strategy:
Train a baseline model on the pre-labeled Kaggle dataset.
Use that model to automatically predict labels for the custom screenshots.
Manually correct the AI’s predictions (much faster than starting from zero).
Configuration: We created a data.yaml configuration file to define the dataset structure. We encountered a path resolution error (FileNotFoundError) where YOLOv8 could not locate the validation images.

🔴 Current Status
System Health:
Codebase: Stable and modular.
Dataset: Organized and configured.
Immediate Next Step: I need resolve the network error to successfully install torch with CUDA support. Once installed, we expect training time to drop from 8 hours to approximately 15-20 minutes, allowing us to proceed with the custom model creation.

Attachment
Attachment
Attachment
Attachment
0
y2marcos1010

📅 2026-01-23 | Entry 001: Architecture & Environment Initialization


We began by defining the project scope and setting up the file system. Instead of a flat file structure, we opted for a modular architecture to separate the source code (src) from the binary assets (assets) and model weights (models). This separation of concerns is critical for preventing file clutter as the dataset grows.

  1. Project Structure: Created standard folder hierarchy (src, assets, models).
  • Installed core dependencies: opencv-python, numpy, ultralytics (YOLO), torch.

  • Successfully verified that PyTorch can see the GPU (or CPU) and OpenCV is loaded.


Build the functional “skeleton” of the application using standard algorithms before adding complex AI training.

TBefore training our own AI, we needed to prove the concept using a pre-trained model. We implemented two core classes:
WatermarkDetector (src/detector.py):
Utilized the yolov8n.pt (Nano) model, which is pre-trained on the COCO dataset.
Limitation: At this stage, the model could only detect common objects (people, cars, etc.), not actual watermarks.
Output: Returns bounding box coordinates (x1, y1, x2, y2) for detected objects.

WatermarkRemover (src/remover.py):
Implemented Mask-Based Inpainting. The logic involves creating a binary mask where the “detected” region is white and the background is black.
Utilized cv2.inpaint with the Telea algorithm. This algorithm looks at the pixels on the boundary of the mask and iteratively propagates them inward to fill the gap.
Created a dynamic masking system: It takes coordinates, paints a white box on a black mask, and fills the hole using neighboring pixels.

Attachment
Attachment
Attachment
Attachment
0
y2marcos1010

this is a just conceptual thing for me right now

High-Level Architecture

To build this “Intelligent Tool,” your pipeline will look like this:

Input: Read the video frame by frame.

Detection Module: Identify the coordinates (x, y, width, height) of the watermark.

Masking: Create a binary mask (black and white image) where white pixels represent the watermark to be removed.

Inpainting Module: Use an algorithm to look at the surrounding pixels and “guess” what should be behind the watermark.

Output: Write the restored frames to a new video file.

Challenges:-

Moving Watermarks: TikTok watermarks bounce around. Your detector needs to run on every frame, or you need to track the object between frames.

Transparent Watermarks: These are very hard to detect because they blend into the background. You often need to analyze the “difference” between frames to find static pixels.

Processing Speed: Video inpainting is heavy. Processing a 1-minute video might take 5-10 minutes on a decent GPU.

Attachment
0